
Hello peeps well I'm finally here with my 1st tutorial. I didnt realise doing a piccy one would take so long to be honest.......so be prepared for lots of piccy's lol.
I've broke my tutorial down so I'm showing you skin today & then I decided to show you how I do a dress showing creases. However I chose the wrong stamp really so I cheated & rather than starting again with another image I just adapted this one for you cus I can still use it for a tag.....you will see what I mean lol.
Please bear with me as this is my 1st tutorial & I have only been colouring for about 7 months so I'm no where near expert. I have no colouring skills what-so-ever this is just how I do it. I have been e-mailed a lot asking about my colouring which is why I've done this 1st.
 This is the card I use, or should I say 1 of them as I do use a few. This one which I will put the link for at the bottom is 1 of the best I have found & the one Emma stocks is a good one, again will put links at the end of post.
I use memento ink when using Promarkers or Copics. I use Stazon when using distress inks or H2O's. I chosen a Tilda stamp today. In the background you can see 2 types of stamping block, 1 obviously is acrylic & the other is the CC rock-a-block....it usually depends on the stamp I'm using of which 1 I use but its mostly the big acrylic 1. You can either cut your image into the shape required with a nestie or just leave it in a square til after you have finished colouring then decide what you will do. To be honest it sometimes depends how I'm feeling when I'm colouring as the result of the colouring will sometimes determine what I do with the image.

2 different images one which I cut around & another I cut in a nestie shape then inked the background. When I'm ill or in a lot of pain I colour to help take my mind off the pain lol then store the images in a plastic tub......which I then sometimes forget about. These 2 were coloured over a week ago lol.
Cutting around the image is ideal if your card bleeds or if you go over the line. You could also create a shadow around the image to hide going outside the line or use a blender pen to erase it as such. Remember to go from out to in when doing this with a blender pen & just do bit at a time & allow to dry in between cus if the card gets too wet then it will bleed no matter what card you use.
When I'm colouring Tilda I always use the same colours on her skin, other images I will change the odd 1 or 2 colours depending what the image is. I always start off with all the skin.....I dont know why lol.

I've broke my tutorial down so I'm showing you skin today & then I decided to show you how I do a dress showing creases. However I chose the wrong stamp really so I cheated & rather than starting again with another image I just adapted this one for you cus I can still use it for a tag.....you will see what I mean lol.
Please bear with me as this is my 1st tutorial & I have only been colouring for about 7 months so I'm no where near expert. I have no colouring skills what-so-ever this is just how I do it. I have been e-mailed a lot asking about my colouring which is why I've done this 1st.

I use memento ink when using Promarkers or Copics. I use Stazon when using distress inks or H2O's. I chosen a Tilda stamp today. In the background you can see 2 types of stamping block, 1 obviously is acrylic & the other is the CC rock-a-block....it usually depends on the stamp I'm using of which 1 I use but its mostly the big acrylic 1. You can either cut your image into the shape required with a nestie or just leave it in a square til after you have finished colouring then decide what you will do. To be honest it sometimes depends how I'm feeling when I'm colouring as the result of the colouring will sometimes determine what I do with the image.

2 different images one which I cut around & another I cut in a nestie shape then inked the background. When I'm ill or in a lot of pain I colour to help take my mind off the pain lol then store the images in a plastic tub......which I then sometimes forget about. These 2 were coloured over a week ago lol.
Cutting around the image is ideal if your card bleeds or if you go over the line. You could also create a shadow around the image to hide going outside the line or use a blender pen to erase it as such. Remember to go from out to in when doing this with a blender pen & just do bit at a time & allow to dry in between cus if the card gets too wet then it will bleed no matter what card you use.
When I'm colouring Tilda I always use the same colours on her skin, other images I will change the odd 1 or 2 colours depending what the image is. I always start off with all the skin.....I dont know why lol.

For the skin I use...
Apricot, Oatmeal & Blush.
For the cheeks I use.....
Sunkissed Pink & Baby Pink

I start off with Apricot around most of the face to create the shadowing....obviously this depends where you want your light coming from. Mine is just gonna be straight ahead. I dont go all the way around as its the hair creating the shadow.

Once I've gone around with Apricot I then move onto Oatmeal & just lightly move inwards on the face. Dont go over the Apricot too much cus you dont want to lighten it. You are creating a bit more shadow just lighter. I normally work with little flicks from the middle of the Apricot its mainly just to start the process of blending the 2 colours together. I hope this is making sense lol.

Sometimes I will just stick to sunkissed.
Next I use the baby pink to rosey up the cheeks but not going all the way to the edges of the sunkissed pink.
Its hard to show up both pinks on camera.


I then going over all the face in Blush using small circular movements. I dont go over the apricot & oatmeal to much just lightly to blend all the colours together so there are no lines. The colours blend into the next one so it looks natural as possible.
I use the same 3 main colours for the rest of the body using the Apricot & Oatmeal to create the shadowing & then finishing with the blush. I only usually do the face once I find that a second coat is not needed. If you do think you need a 2nd coat I always wait til it dries cus it does darken slightly once dry & so it could be that you would of been happy with the end colour. Also you always want to try not to wet the card too much as it will cause bleeding.

China Blue,
Denim Blue
& Powder Blue
So imagine there isn't another layer underneath & the top layer is the whole dress lol. I do like to make things hard dont I. 1 day I will do a video tutorial lol.
For the dress I start off with the darkest which is the China blue & just go around the edge to show where any shadowing would be.

The next colour to go on is the Denim blue to create a lighter stage of shadowing. Again I go over the previous colour lightly so as not to lighten it just merging the 2 colours together.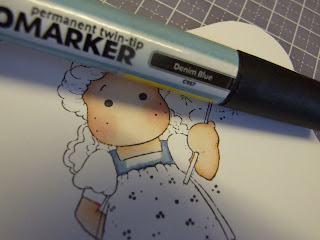

I then again in small circular movements blend it all together using the lightest blue which here is the Powder blue. Usually I always work with 3-4 different shades of 1 colour starting off with the darkest creating shadows.

Onto the bottom of the dress I start off again with the China blue & go around where I think there would be shadowing, ie creases & folds etc.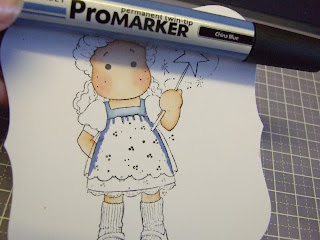

With the Denim I then create the 2nd stage of shadowing. Now this is where the piccy looks weird I havn't lost my mind dont worry lol. With the denim I also want to create the ripples that you would get in a dress......the natural flow of....not quite sure if I'm saying the right word but you will know what I mean by the next piccy lol. Where I think the material will dip to create this ripple effect I put a thick line going from the edge of the dress to round about the middle. Remembering to also lighly go over the China blue to merge
the colours.

Finally I go over the whole of the dress blending in all the colours with the Powder blue. The ripples at the top I've gone over 1 in the Powder blue & the other I've left some white showing so you can see both effects. These are the parts of the dress getting most light.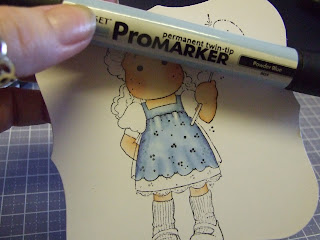

 Here is the final piccy of this tutorial. Can you see how the lines created the shadows on the dress to make the ripples appear. I'm no good at explaining things......its a good job I'm typing cus my arms & hands would be everywhere trying to show actions instead pmsl.
Well I think you have suffered enough now....I know I have!! I will do another tutorial on the hair in the next day or 2.....I will find a nice stamp for that. If you got to the end then well done to you & I am so sooo sorry if I've bored you lol. Please tell me what you think I've never done a tutorial before. I am not an artist in any shape or form, I have no qualifications this is purely my way of colouring.
The shops where you can get this card from is Crafts & Me & I get large packs of 100 sheets from
Sir-Stamp-A-Lot. Emma also does fab card for PM's & Copics which you can find here & are available in 2 different thicknesses. All of the card I use is also fab to print out digi images onto. I use an epson printer & compatible inks (not epson ink) & have no problems with ink..... to be honest a lot of time I colour onto it straight away I dont wait for drying or sealing the ink or anything.
Thankyou so much for looking at my tutorial if you have any questions or would like more info on anything then please dont hesitate to e-mail me & I will do what I can to help you.
Hope to see you again I appreciate all your comments, they mean the world to me.
Huggles

29 comments:
wow... this tutorial is amazing hun.
i love how you explain everything so even beginners can understand and follow.
loving how you did the folds in her dress.
thank you for seeing me today and your super sweet comment!
hugs
Claudia
Fantabulous Hunny
I will definatley be using some of your tips.
You did an amazing job.
;0)
Hugs Kaylou xoxo
super duper hun the piccies were very good getting the detail and i understood your descriptions perfectly. I like the shading on her dress i'll borrow that idea if i may. It's nice to see how others colour i always find it interesting and pick up little tips. Can't wait for the next instalment. Take care
Angie x
Fabbie tutorial sweetie with great tips, thank you!!
hugs and xxx
Thanks for that, Vicky. I'll definitely be referring to your tute when I've got more time to spend colouring. Looking forward to the hair one! Hugs, Marie xx
Well to say this is the first!!! It's fabulous such clear instructions and so well presented!!! Love it Vicky well done you really are a star!! Chanelle xxxx
Very informative hunnie. Not sure if I will be clever enough to make my creations look any better. Thank for the tution.
Hugs
Cathy
xxxx
This is fantastic Vicky!
Easy to understand and well presented. Thank you for doing this sweetie:)
Hugs, Heidi:)
fabby tutorial thanks its nice to see the different colours people use for skin tones thanks very much xx
hi vicky! thanks for the tut, i really needed that. i just need to let you now that i linked to your blog on my post about the sweet pea candy. Is that ok with yoU? sorry for not asking you about it first. i can delete your link if you want me to.just let me now. hugs!
Oooh Vicky thank you so much, as you've seen I'm a total novice with my Promarkers so this is fabulous to see. Thank you so much for taking the time to put it together & post, you're a star. Hugs x
A brilliant tutorial hun, very well explained with lots of tips, well done.
xxx
Fab!! tutorial hun,your colouring is beautiful sweetie.
Hugs
Sheila xx
Ooooh... love your tutorial, Vicky! Very well explained and great pic's too.
I just did a tutorial today... my first as I'm a bit shy with my colouring, but got badgered into it. LOL!
Anyway, just wanted to tell you yours is GREAT!
Some more mushy stuff coming your way...
MWAH...
Meesh. XX
Great thanks Meesh recommended your tutorial and it is great as is hers! I would love to be as good as you two - maybe one day!
Great tutorial Vicky...well explained and great pics...I do struggle with my colouring but onwards and upwards as they say. Thanks for the tips. x
Hey Sweetie!
Fabby tut. And it wasn`t too boring either, lol. I really got through the whole thing without falling asleep, lol. No seriously thanks for a great tut. I allways start in the opposit direction but i think i will have to try it this way and i hope my images gets better, lol. Hugs...Mona
Fantastic Tut, Thanks, havent got the apricot so thats on my list and wouldnt have thought of Oatmeal, mine either look to orange or too pale, will def try these.
Chris x
Awesome Tut, Thank you so much for sharing your expertise and knowledge,
Have a fabulous Saturday,
Hugs Bridget :0) x
PS i have become a follower.
great tutorial, thanks hun xxx
Super colouring Tutorial Vicky, Excellent!!
This is a super tutorial!!! Thanks!!!
I'm about to go colour my first face and arms in using my Promarkers. Up til now I have only used them for block colouring. Your tutorial was exactly what I needed to get me started - thank you
Fab tutorial, thank you for sharing your knowledge xxx
Thanks Vicky for your tutorial, early days for me with promarkers. Found you through google...hope to be able to achieve the shading on my dress! Will be back I'm sure, such lovely creations. Carolxx
Great tutorial! Thank you so much for sharing your lovley work!
Hi Vicky!
I really enjoyed your tutorial. Very well put together.
Hugs Maz
Gracias por el tutorial, me viene muy bien, ya que, hace poco que me he comprado los promarkers de color de piel, felicidades por tu trabajo. Un saludo.
Fab tutorial Vicky! Love the way you've explained it and I could follow everything you were saying! So no worries there hun. Love the 'ripples' on the dress, I need to do better with those sorts of details, I'm a bit basic yet in my approach, so this is inspiring, thanks. Big hugs, Wends xxx
Post a Comment