My Lovely Friends

Saturday 24 January 2015

Hugs From Live & Love Crafts DT

Hi everyone, yay its the weekend & its Saturday which means its my turn to post over at the Live & Love crafts Blog. Now Sandra has challenged us with the theme 'Hugs' because on wednesday it was National Hug day. Who knew that one existed............. certainly not me lol.
Anyway I have made something for my Natalie again for when her bedroom is done & I've made her a Wall Hanging.
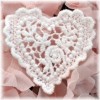
Now to mean love & hugs go hand in hand, even more when its your family, so this is a Heart Shaped Wall Hanging, of course Shabby Chic as that's what her bedroom is ;-)
Now its VERY pic heavy & I will try get a better pic of the whole thing today in the daylight, the first one was took in my shower room at midnight :-(
All links to items used will be at the bottom of the post.
I also used 2 of my new Magnolia stamps, was saving them for this ;-) I have to say this is a lot prettier in real life......well I'm even happy with it. Now that doesn't happen often!!!


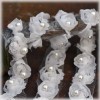
Ok so this is the first heart, I used the same paper on all 3 hearts & I used paper from the new Maja Design 'Nyhavn Limited Edition'........these are so gorgeous.
I added Metal Heart clip & a Ticket cut from Pion papers behind it. Would you believ Gesso got everywhere on this project lol.

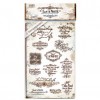
The sentiment stamp is Stempleglede 'Just A Note' stamp set, I lurve this set...........one of my favourite stamp sets & my most used one tbh.
Magnolia stamp used is 'Stop In The Name Of Love'.

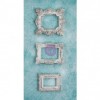
The middle heart I made a pocket on the front with the reverse of the Maja paper I used. The pocket I added so I could add notes to my daughter to tell her how much she is loved.
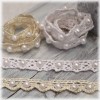
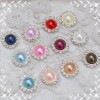
The 'Big Hugs' sentiment is Stempleglede 'Just A Note' & I added this gorgeous resin frame, this is gorgeous..........must get more of these!!
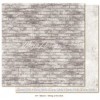
The bricks I made using a Dutch Dubadoo Brick Mask Art from Tracy's shop here, I used the fabby Structure Paste.......... I brought this stuff before christmas then totally forgot about it :-(
I cut them out & attached them before attaching the Resin Frame.

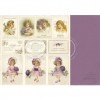
The tags are from Pion's 'My Precious Daughter' collection. On 1 large tag I added one of the sentiments & the other tag is actually a postcard turned into a tag & again I added a sentiment from the collection. I also added a 'Key' charm to each one. I also cut out 2 smaller tags which I will write private messages on to her.

This is the third & last heart, each heart is attached by double sided satin ribbon in lilac, such a pretty shade. The layout & embellishments are the same as the first heart. I just added a different ticket under the metal heart clip.
There are quite a few layers of paper, cheesecloth, corrugated card & a couple lots of cardboard.
Magnolia stamp used here is Loves Me Loves Me Not.

This is the ending of the ribbon on the hanging with a Clay Heart.


I used another of my Magnolia stamps & another sentiment from the Stempleglede 'Just A Note' stamp set. I thought this one was perfect for the stamp I had used. Both stamped images were coloured with distress ink refills & distress markers. I also added dots to her dress & hair ribbon to make it a Polka dot dress. The centre of the flower I also added Stickles.

Well thats it from me, I'm starting to move craft rooms today...........lots of work to do.
Sandra is closing her store for 2 weeks on Thursday so any shoping you want to do, do it now, Also she has the yummy new Pion papers in.............trust you are going to want them all!!! So pop on over to Live & Love Crafts & look at the yummy new stuff Sandra has in.

Thank you for stopping by, huge hugs to you all.
Lotsa hugs Vicky xxxxxxxxxxxx

EDITED to change first piccy, now in daylight lol.

Challenges I'm Entering.............
Noor Design Challenge UK -  With Love
Papertake Weekly - Get In Shape
Midweek Magnolia's - New Stash ( Hi girls miss you) new stamps, paper, ribbon & seam binding


Thursday 22 January 2015

Good Friends

Hello my lovelies, I want to start by saying a huge thank you for your lovely comments on my tutorial yesterday. I have to say tbh I havnt made a card like that for a long time........now in all honesty I just go with the flow & grab things as I go along, I NEVER plan anything on my cards anymore lol.

Ok so I'm here with another card today.......will tell you about my busy busy at the end ;-)
Hubster got me a few LOTV stamps & new paper pads for christmas, I also got a few memory keepers things as well. Anyway I had to, just HAD to get this pad........well because it's PURPLE!!!

Nearly all of the lush flowers are from Live & Love Crafts. The seam binding is from my stash.

The sentiment stamp is also LOTV Quotables 'friendship', I lurve these stamps & will eventually collect them all, hopefully lol. This one I stamped onto the same LOTV paper with versamark then heat embossed it with Opaque White embossing powder. I love the effect of it.

The purple button in the centre of the bows is from my stash. The leaf die is a MB Die, U cut 2 one for each corner.

The pretty paper is LOTV 'Snow Princess' & what I lurve about this is that its not really a christmas patterned paper, so its fab for ALL year round!! I machine stitched all around the edges. As always inside is decorated to compliment the front.
I also added tiny lilac pearls to each corner.

Ok so now to tell you why we are busy here. Well in March we are having builders here to build an extension for Natalie, it will be adding to her bedroom & building a huge bathroom for her. Our current one is not big enough for 2 carers & she needs 2 -3 carers 24/7. Anyway when they are doing it we may need to transfer Natalie into the living room to sleep, so this means that really we need the conservatory to sit & relax in as we wont have the living room. 
Yep my craft room is moving again lol...........I'm going back to my hobbit at the bottom of the garden. Thankfully my corner suite we stored in there, so that can come back out & all my craft stash moved back in. We managed to get hold of a big dining table the other day with 8 chairs, well I have the family over a lot lol. So as we dont have the storage for the table for long everything is getting moved this week, hopefully will be moved in by next Monday. Then just need unpack everything......again lol. I aint moving again lol. I will miss my big room a tiny bit but tbh I've missed it as a conservatory & my family & daughter come first. Not looking forward to any of the upheavel this year but it will be worth it in the end.
This is the first time Natalie has had any alterations done, not bad in 22 years. Luckily we are not paying as its costing just over £22,000, the bath for her is costing £10,000...........which is bloody ridiculous, talk about exploiting the disabled........ Ok I better not climb on that horse as I get annoyed.

Ok enough of my babble, would you like to see my room when I'm done...........again lol.
I am keeping it the same colours as it was when I was in there the last time, so the only different thing will be my dresser as thats in the bungalow now in the passageway.........it houses my large Betty Boop figurines lol.

Well thank you for popping by to see my card & listening to me droan on lol. Tatty bye my lovelies, take care.
Lotsa hugs Vicky xxxxxxxxxx


Wednesday 21 January 2015

A Sort Of Tutorial On Fussy Cards

Hello everyone how are you all? Things are busy busy here but will explain about that another day.
Ok so I've been sent quite a few emails in the past about people asking me for tips on how to cards with foofiness on, ya know fussy kinda cards. I also got a recent email just a few days ago from a lovely lady who usually makes beautiful CAS cards but needs to make a fussy card. I am truly honoured that these people email me asking for advice & tips from me........yeah little old me. 
Now these peeps dont want go full on over-board fussy & fancy, just something thats different to their usual style & that can still be called fussy.
So I decided to do sort of a tutorial for everyone who wants to know about...well foofiness as I call it lol. 
Lots of piccies here peeps I'm afraid. Forgive the lighting, as when I started it was a very grey day outside & then later on it had gone dark lol.........with Natalie not being well I did it in bits lol.
First of all the with fussy cards you can cheat & add in more layers than what you would normally. So with your image already coloured choose your papers to match.........or do it the other way around if thats the way you prefer lol.
Here I have cut to size & machine stitched all around.

I layer all my paper onto card for extra stablitity & it provides that extra layer & defines the paper, if you know what I mean. So decide which layout you want your papers, this simple one can actually be laid out a few different ways.

Now either glue or tape your layers down, I prefer to glue mine. I also use paper clips as you can see to keep it secure especially in the corners while the glue is drying.

Now I have 2 sets because as you know I decorate the inside, the main reason for this as I find when doing fussy cards you have a heaviness to the front of the card which can then make your back piece feel weak & flimsy. It also looks nicer I think.
Always make sure though that if you have a centre bit going across like this one that its level on both pieces.

Ok while your card bits are drying get together the flowers, lace/ribbon & any other bits & bobs you think you may use.......whatever you dont use can be just put back away. Also here I've cut out the frame my image will be going on.  Every foofy kinda card needs lace or ribbon lol, or even both lol.

Its up to you how you attach your lace/ribbon, either glue or double backed tape. I use slim tape & I also staple it either end into place, the tape just keeps it secure while I staple it.
If you enlarge the pic you should be able see the tape just above the watermark.

I've attached the image to the frame & now I attach it to the card. I use foam tape to accomodate the thickness of the lace, its up to you how you do yours & also depends on the thickness of your lace/ribbon.
I attach 2 pieces of foam then just put some glue directly on the card where it will go directly on the lace.

Now grab your flowers ect. The leaves I cut out in green but dabbed with gesso to soften them.
Now if you are new to putting flowers on your cards & dont know where to put them start off by placing them on the corners of your image, or the sides ect. Keep them around your image, unless your image is tiny then it wont work as well. Try to keep things symmetrical thats the easiest way at first. As you can see the bottom left I have the large flower in the centre, then smaller ones either side, the same flower on each side as it goes down in size. The top right I've just used 3 flowers but used the same as in the bottom left.
I'm extremely anal when it comes to colour coding & symmetry lol.

Some of the stems I have curled. To do this just wrap the stem around something. I useeither a crochet hook or like in this picture a slim paintbrush.

Ok once hapy with how your foofiness looks, glue it all down ;-)
Here is the finished card & better pics now its in the lightbox lol. I added pearls to 2 corners & I also added scalloped pearls to hide the staples ;-) Tbh I dont always hide them depends what sort of card it is as shabby chic blends in perfectly lol.

This is the finshed inside & the staples here I've hidden by adding a little bit of gesso to them. You may be able to see if you enlarge it.

I also added a sentiment tag from LOTV. Nearly all the products I've used are from LLC, the paper is Maja Design Vintage Summer Basics 6x6 pad, the flowers are WOC from LLC & I've added in some Pearl String within the flowers. The gorgeous yummy lace is also form LLC as are the pearls.
All links are in red writing. The stamp is Magnolia Tilda In Ballet Shoes & was coloured with distress ink markers.

Sorry for the looong post but I hope its helped a few of those that dont know how to place flowers & do the whole fussy & fancy kinda cards. After doing a few basic foofy ones you will soon get the hang of it & before you know it you could even become addicted to this way lol.

Thank you for putting up with me & those that are still here, well done you lol.
Take care lovelies & will see you soon.
Tomorrow I have a different kinda card, for me anyway lol. I will also explain why things are a wee bit busy here at the mo. Some of it may shock you or probably even say ,What again??' lol.
Stay tuned until next time..............SEE YA hee hee.

Lotsa huggles Vicky xxxxxxxx