Pages

Thursday, 25 October 2012

Saturated Canary DT Card - Not Square

Hello my lovelies how are you all? Well its that time again for another new challenge over at Saturated Canary.............the creations you keep bringing to us are amazing, you always knock our socks & its awesome to see what you do with Krista's gorgeous images.
So onto the challenge..........this time around we would like to see............
SHAPED CARDS - NO SQUARES ALLOWED
Yep shapely cards, whether it be circle, oval, star etc............just dont bring no square cards, cus this fortnight 'We aint Square'!!!
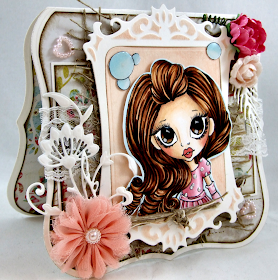
I have cropped one of Krista's lush images..........this is one of the reasons I lurve digi images.
I have cropped 'Bubbles' I will put copics colours at the bottom.

I have added 'Anja Leaf' & some gorgeous fabric & paper Prima Flowers. Lace is from my stash.

The image I have also added 'Glossy Accents' to her eyes & bubbles, I've cut the bubbles out to place elsewhere. I also added Pearls to her spots on her dress. I've also added a beautiful fabric Prima Flower & Marianne's 'Tiny's Flower 3' which I have to say is lush & I will be buying the rest for sure ;0)

I so love these 'Cabaletta' flowers, they are gorgeous!! I've used used Prima 'Madeline' A4 papers & inked the edges with Walnut DI. I used my Grand Calibur to cut out the card shape.

Also decorated inside to compliment the front. I inked parts of the frame with Tattered Rose DI. I added Hessian Scrim under the frame & with a few loose strands tied some together at the bottom of the frame

Ingredients used.............
'Bubbles' digi image - Saturated Canary
Prima Flowers - My Crafty Heart
Marianne Anja Leaf die - My Crafty Heart
Viva Pearl Pen - My Crafty Heart
Pearl Hearts - My Crafty Heart
Glossy Accents - My Crafty Heart
Marianne Tinys Flower 3 - My Crafty Heart
Prima Madeline A4 paper 
Loose Hessian Scrim
White Lace

Copics used - E13, E21, E00, E000, E0000, R22, R20
E29, E27 E23 E21
R85, R83, R81, RV10

Please pop on over to see my uber talented teamies creations, they will knocks your socks off.

Well my Workbox has arrived woopeeeee, so hubster & me are putting it together now, well I'm multi tasking & cooking tea as well good job I put something in the slow cooker this morning lol.
Right off to play with my nuts ;0)
Wish us luck lol.
Thank you soooooooooo much for stopping by you all totally rock mmwah!!!!!!!


Wednesday, 24 October 2012

Quick & Simple Tutorial, Fab for Halloween

Howdi doody my lovelies, well I'm back with my tutorial. I've had a few people to email asking me how I make the Sweety Bags for Halloween..........they are so simple & so quick to make, which is ideal if like me you plan on making lots lol. 'Photo Heavy'

These are the main items you will need...............
Re-Sealable Bags, your choice of size(re-sealable is better so they can be closed)
A4 or A5 coloured card, your choice of colour
Halloween paper
Stamped image coloured or a Pre-Coloured Image
Dies
Glue or Tape
Distress Ink (optional)
Get your re-sealable bag & choose your die slightly smaller than the bag. I think mine are about 5x5 inches, I actually use them to put my coloured images in before they go in the box, they help protect them. You can get these bags on Ebay & they are quite cheap.
Using your die cut out your shape, if like me you are making a few (lots lol) then with this size you can get 2 to every piece of A4 card. Save the excess bit at the bottom.
Put your cut out shapes to one side & with the scraps at the bottom cut out what you want going along the bottom of the bag, i.e Fence, grass etc. Place a line of good strong glue (or strong double-sided tape) along the bottom of each bag.

Place your die-cuts along the bottom & keep in place using paper-clips or mini pegs. Set these aside so they can dry while you make the tops.
Ok so you have your card cut out next you will need to cut out your paper to mat on top. I dont like a big size difference so with the same die as used on the card I draw around the inside & then cut it out using scissors.
Ink the edges of the paper to give it a distressed look. I've used Black Soot distress ink.
Using glue(or use tape) attach your paper to the die-cutted card

Turn it over & score about 1/4 way down, I've marked the score with a pencil so you can see it easier.
Fold bacl along the scored line.
Now you can decorate the tops. I've cropped 'Zombie Niamh' by Saturated Canary & coloured her with copics. I've also used a pre-coloured image, 'Franky Pastry' from The Paper Shelter. Images from there you get a digi image & a pre-coloured image, how fab is that!! As I have so many to do I decided that pre-coloured images were the way to go lol.
I've cut out some die-cut trees, my sentiments & some buttons from my stash.
I've added the sentiments to the bottom & got everything glued to my tops & added sweets to the bag.

Place the top over the bag so the fold is at the edge of the bag & then staple each side.

This is how it looks at the back.
Here is a few of them, I only have 12 done up to now, the rest will be done by Sunday tho. I've still got get sweeties to put in them as well, so its a trip to Asda & Tesco me thinks lol.
I have used a mixture of pre-coloured images & of course 1 of my own coloured images. I also need to add sentiments to them all.

Ingredients used..............
Grassland Border - My Crafty Heart
'Happy Halloween' sentiment - Delicious Doodles
'Too Cute To Spook' sentiment - Tiddly Inks
Leafy Branch - My Crafty Heart
'Niamh Zombie' digi image - Saturated Canary
Pre-Coloured images - The Paper Shelter & Digital Delights

Well thats it, I hope you like my Sweety Bag tutorial, if you have any problems please feel free to email me at anytime.
Right I have sooooooooo much bloggy catching up to do now so am gonna get going. Will be back tomorrow afternoon with my Saturated Canary DT Card.
Thank you for stopping by, it means the world, mmwah.
Toodles xxxxxxxxxxxxxxx

Challenges I'm Entering..........
No Matter Which - Halloween Creations
Corrosive Challenge Blog - Treacherous Treats
The Paper Shelter - Halloween


Crafts & Me DT Card - Marna Fairy

Good morning my lovelies how are you all? I saw my first red robin yesterday sitting on my fence when I was at the kitchen sink..........yea thats when you know the big guy is coming soon ;0)

Anyhoos onto the task in hand, today sees a new challenge over at Crafts & Me & this weeks the lovely Karina has chosen the theme of............

FANTASY CREATURES
So bring your fairies, angels, goblins, mermaids, wizards etc along to join in the fun..........come on they will love it!!!!!!!!!
Okay for mine I decided to ink up a stamp that was still sat in its packet since last year :0(
I think my mojo stayed in the conservatory cuddled up to Craig while I went into the hobbit :0(

I do like to keep my cards looking different...........well this certainly is lol.
The lush paper is Prima's 'Doodle Deux', I matted onto black card & inked edges with black soot.

The image is 'Marna Fairy' by Hannah Lynn & I coloured her with my trusty copics. I wanted a more porcelain look for her face so was careful with shading. I did her hair black & blue (greys) & her wings I cant remember the colours as I wanted a few blended in there to go with papers.
Yes for once I actually picked my papers first.........go me lol.  Also added glimmer dust & pearl dots to her wings with the pen.

I added scrim with a splashing of White Gesso on parts & I tied some black lace from my stash into a bow. The sentiment I did with my Dymo & added to a Joy Crafts die, I so love these ;0) Also added a Joy Crafts corner die & a Prima flower.

Ingredients used.............
Marna Fairy rubber stamp - Crafts & Me
Prima 'Doodle Deux' papers - My Crafty Heart
White Gesso - Crafts & Me
Prima Flower - My Crafty Heart
Viva Pearl Pen - My Crafty Heart

Thats it from me but please pop on over to see the gorgeous work of my teamies.
Thank you sooooo much for stopping by I'm off for a quick bloggy hop.
Tatty bye for now mmwah xxxxxxxx


Tuesday, 23 October 2012

A Wobbly Christmas


Hello my lovelies, how are you? I really hope its not awful, foggy, murky & grey where you are......however if it is like it is here.............CRAFT!!!!!!!
I thought I would pop this card on I made last week with some thingy's that Krista sent us DT girls...........I forgot to post it on my blog......but tbh it didnt turn out quite the way I hoped so didnt know whether to post.......but what the 'eck lol.
I have used NO backing paper at all on this, I've just embossed, die-cutted, snowed, glittered & inked lol. Yes die-cutted is a word its in the 'Victionary'......;0)

I cut out 2 trees using Marianne christmas tree die, I inked the edges with Weathered Wood DI & added some foamy-uppy stuff to look like snow ;0)

This shows the dimension of the die-cuts & image. Krista sent us all some 'Wobblies' (thats what I call them lol), Action Wobble Springs. I added them under the trees, the clouds & of course the image.................so they all wobble.....its so cool:0)
In the uk you can get them here.

The image is of course Saturated Canary 'Spritz', isnt he the cutest!!! I have of course coloured him with copics...........ooops I forgot colours his eyes, oh poop!!!
The wings also got a splashing of 'Stardust' stickles ;0)
To make the background I inked a sky using Weathered Wood & Tumbled Glass distress inks for the clouds, then embossed it with a spotty folder backwards...........its supposed to resemble snow. For the bottom I used 2 scrap pieces of card, ripped the edges & again embossed it but so the spots faced the right way.....as in the snow has falledn. I also added more 'Stardust' stickles along the edges & then placed 1 card on top of the other & add them to the bottom..........snowy hills & sky lol.
I think I should have added the image more to the bottom so he was level with the trees but never mind.

Well peeps there's a simples card........still not sure about it but.......well its always good to play isn't it lol. I will be back tomorrow with a DT card then I will be back tomorrow night with a tutorial ;0) I'm off to catch up with you all now so see yous soonies.
Welcome to all my new followers, thank you so much for joining me :0)

Tatty byes sweeties mmwah, thank you for popping by xxxxxxxxxx